Archives: Wikis

IoTService

iotresource1

IoTService

The IoTService provides functionality for device discovery and access. Available actions:


createWS
Creates a web service for the device
Returns the endpoint for the web service1


GetDiscoveryInfo
Read the physical discovery information that is associated with the device
Returns: Discovery data encoded in XML string


GetDACEndpoint
Returns the WS endpoint for the local (LinkSmart) Device Application Catalogue (DAC) that has discovered the device.
Returns: The endpoint of the current DAC


GetErrorMessage
Get errormessage for the device
Returns: Latest error message


GetIoTID
Get IoTID for the device
Returns: The HID of the device


GetHasError
Check the device for possible error
Returns: True if error, False otherwise


GetWSEndpoint
Returns the endpoint where the device’s web service is located


GetIoTWSEndpoint
Returns the endpoint where the device’s generic IoT web service is located


GetProperty
Returns a property of the device. A developer can choose any properties she likes to use and set.
Argument: A valid property name (valid XML element name, QNname)
Retunrs: The value of the property<


GetStatus
Query device status
Returns: The status depending on the type of IoTResource


GetWSDL
Returns the WSDL file describing the web service ssociated with the device


SetDACEndpoint
Sets the endpoint of the DAC that has discovered the device
Returns: The endpoint of the device WS


SetIoTID
Sets the IoTID for the device
Argument: IoTID, string
Returns: valid IoTID


SetProperty
Sets a property of the device. A developer can choose any properties she likes to use and set.
Argument: property, a valid property name (valid XML element name, QName)
Argument: value, the value of the property


SetStatus
Sets the status for the device
Argument: Status, a status value choosen by the developer


Stop
Stops the device, which will cause it to be removed from its current DAC. The device can later be re-started.


StopIoTWS
Stops the generic IoT web service of the device.


StopWS
Stops the web service associated with the device.


REST API

Each IoT Resource provides an easy-to-use REST interface to retrieve data about the resource and it is current state. It is also possible to invoke actions.

Retrieving Services

By providing the endpoint and the keyword services it is possible to retrieve all services offered.resourceREST1

Retrieving Statevariables

Supplying the service name and the keyword statevariables will list all statevariables associated with the service. is

resourceREST2

Checking Statevariable Values

resourceREST3

Retrieving Actions

resourceREST4

Invoking Actions

Actions can be invoked using parameters following the syntax action?param1=X&param2=Y

Summary

http://<endpoint>/services  Retrieves all services offered by the IoTResource
http://<endpoint>/services/<name> Retrieves all state variables associated with the service
http://<endpoint>/services/<name>/statevariables Retrieves the current value of all state variables
http://<endpoint>/services/<name>/statevariables/<name> Retrieves the value of a specified state variable
http://<endpoint>/services/<name>/actions Retrieves all actions that can be performed on the IoTResource
http://<endpoint>/services/<name>/actions/<name>?param1=X&param2=Y Invokes an action with or without parameters.

Creating IoT Resources

The IoTResource Builder allows you to define your IoTResources and automatically generate the necessary IoTResource code stubs. Services can then be built using these IoTResources. The IoTResources are typically used to interface IoTThings (various networked devices, or physical objects associated with devices) in some IoTWorld.

Creating services with actions and state variables

Below is a step by step walk through on how to create service access points  to IoT Resources. To do this, we need to create a Service including a set of Service Actions and their related State Variables.

In the case below we will define a service, with related annotations and actions,  for an Air Quality monitoring device. This device  can be used to read CO2 values measured in ppm´s (parts per million) as an indication of the current indoor air quality (IDA). The air quality can then be presented either as an absolute CO2 value, or, as named intervals: High, Medium, Moderate or Low air quality (formally referred to as IDA1-IDA4 in the EN13779 standard). Each interval defines a CO2 range, e.g., IDA1 (High) is 0 – 400 ppm’s CO2.

Name and describe the service

The first step is to name the service and provide some basic annotations (meta data descriptions) in order to  facilitate discovery and help others to understand the service semantics.

RB_ServiceAnnotations

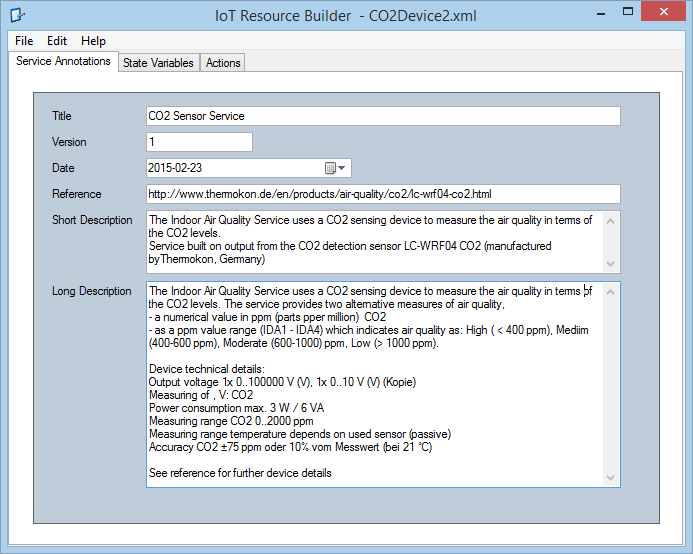
As can be seen from the Service annotation above, this service should  return two alternative measures: a value for the CO2 level in ppm, or in terms of named intervals following the air quality standard.

Following this the needed set of Actions (methods)  and effects for this service should analysed and decided.

Create State Variables for the Actions

Continue to define the  returns from the actions. Most actions will need to have their own State Variables defined, in this service they will be used to  hold the return values of actions. In some cases state variables may also be needed as input arguments to actions.

A State Variable for the CO2 level

This variable will hold a simple CO2 value. The unit is ppm, based on a simple type .

RB_StateVarCO2Level

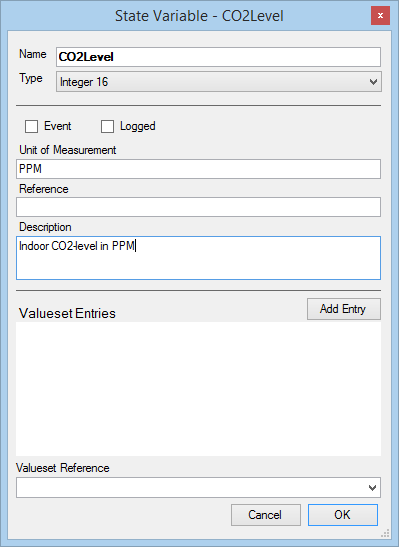
It is good practice to provide some annotations also for the State Variables, at minimum a description, and above also the unit (ppm). The Reference field can be used to point at some external source used to describe this variable (some controlled vocabulary, or even  an ontology).

A State Variable for Air Quality in intervals of ppm   (IDA)

The next variable is a bit more interresting, since is also should include a custom value set. This is for representing the CO2 intervals mentioned above (named IDA1 – IDA4).

RB_StateVarAirQuality

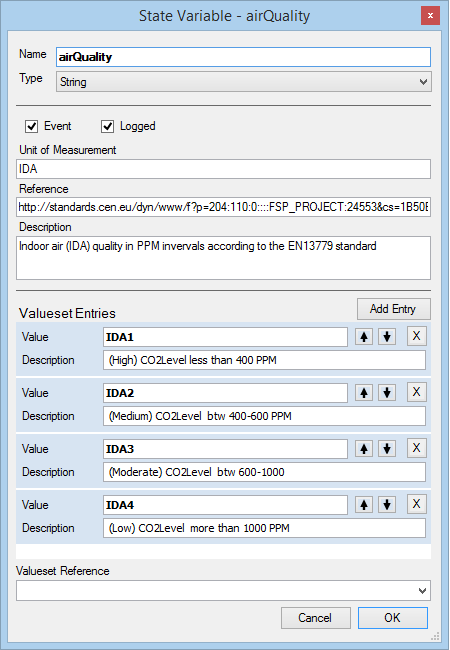
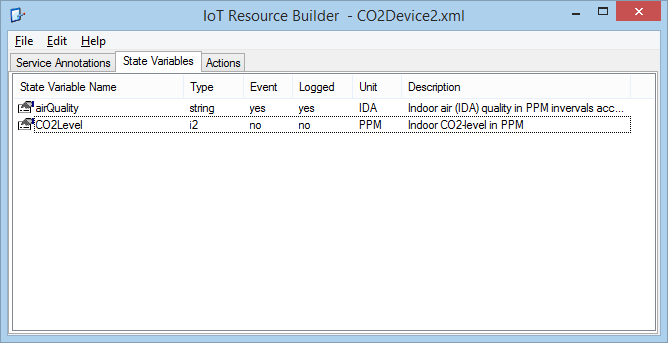
The UoM is her denoted as IDA, and we use the Reference annotation to make a link to the European standard on which these CO2 intrervals are based.  The link is further explained in the Descriptions field.  Looking at the State Variables Tab we see the current set of defiend variables.

Summary Tab with the state variables for ppm and IDA intervals

RB_StateVarTab

We continue with the definitions of the Actions to be associated with the above variables.

Create Actions for the Service

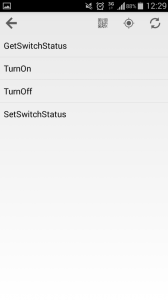
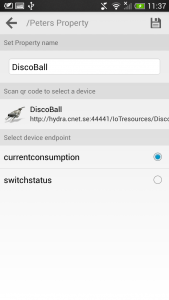
For this Service we will define two actions that are going to be used to retrieve sensor values (IoTObservations) from the Air Quality Device, using the state variables above. The first action will get the current (last available) CO2 value from the sensor device, in ppm (parts per million). A third Action will be added, which can be used to Turn On/Off the device.

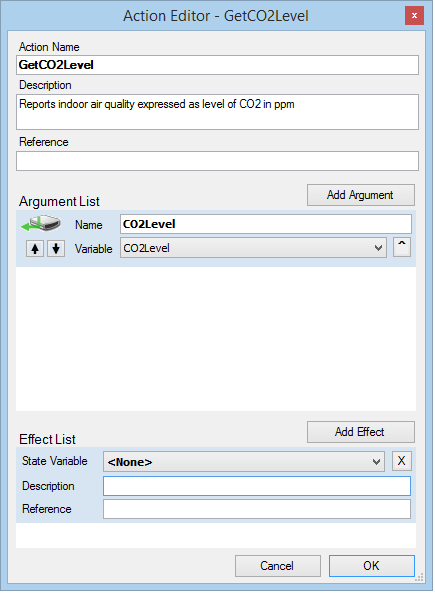
Create an Action to return the CO2 level in ppm’s

Provide the name and a short description. Then select the orresponding state variable is selected in the Aurgument List.

RB_ActionGetCO2Level

Actions can also be annotated with a list of possible Effects they might have in the applications context, or more specifically on other state variables. As an example, turning off a fan might cause a temperature raise, and perhaps also a decrease in energy consumption.  Note that these “effects” are not to be seen as hard dependencies between actions/ state variables  maintained by the service run-time, but rather as a way to document possible effects in the application context and  IoT Domain. The effect annotations can then, like all service annotations, be made searchable for developers as  an aid in service development.

Action for retrieving Indoor Air Quality (IDA) in ppm intervals.

In order to return the CO2 in ppm intervals we link the action to the previousle defined state variable with the value set for IDA intervals.

RB_ActionGetIndoorAirQuality

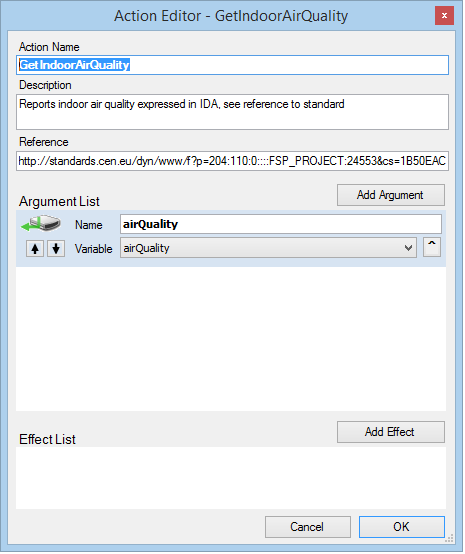
We also provide a link the EU standard in the Reference field.

Finally we also add an action for turning the sensor device off.

RB_ActionToggleCO2Sensor

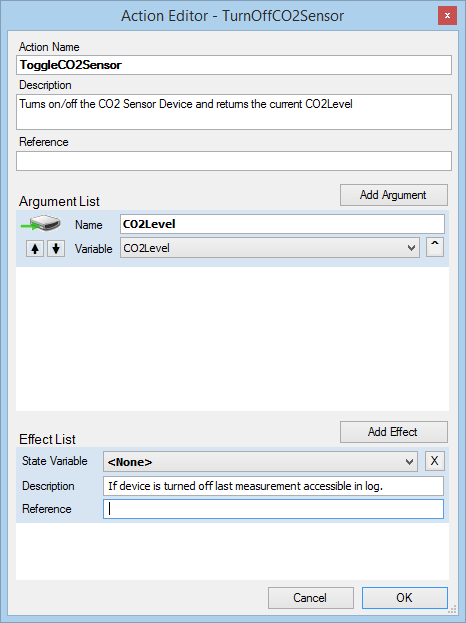
For this action we also add an effect annotation, which simply states that at turn off, the latest observation will be cached.

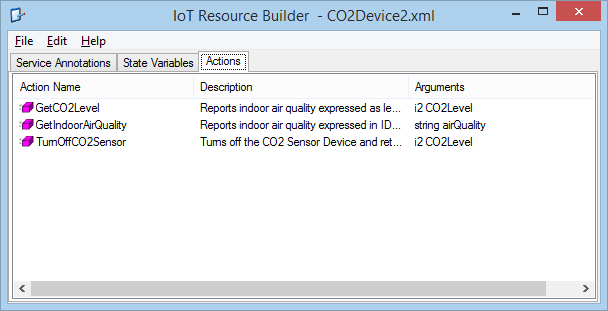
Summary list of Actions and State Variables for the Service

RB_ActionTab

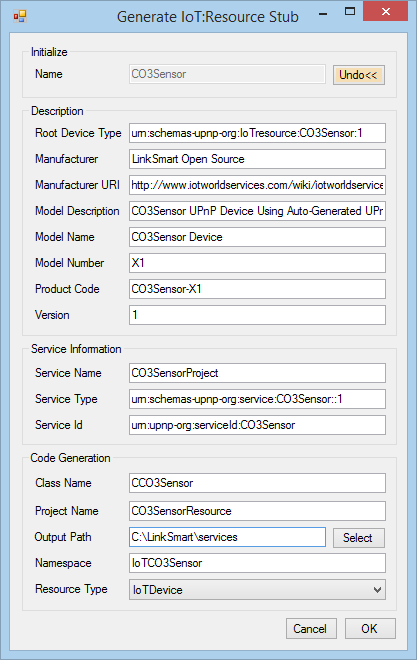
Generate the code stub for this IoTResource

Now the code stubs for the Service and the IoTResource specified can be genererated.

RB_GenerateResourceStub

The generated results include the Service definition in XML, as well as the development project files. The generated VS project is shown below.

RB_VS_CO2SensorResource

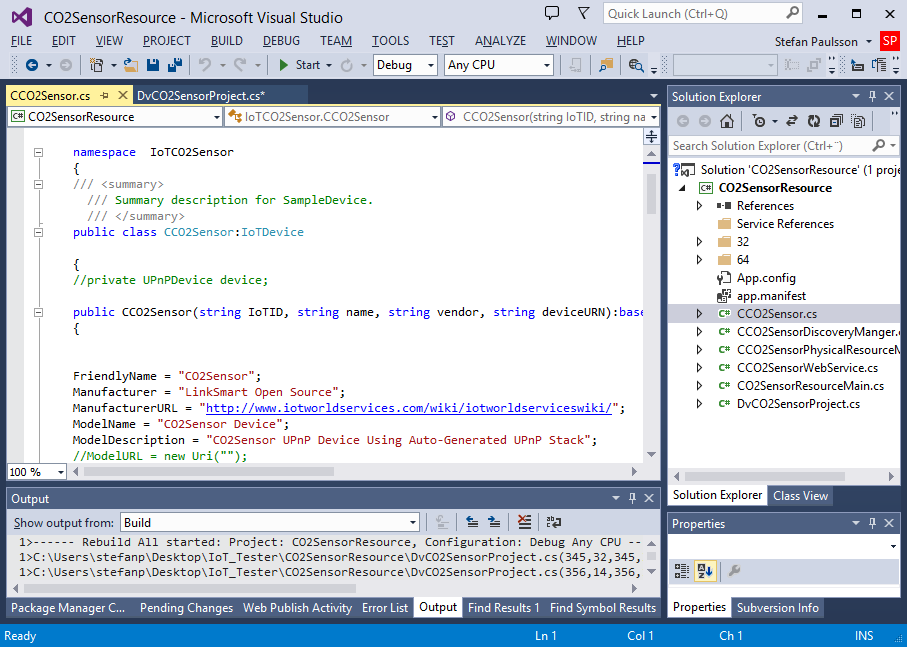
This project can then be used by the developer to extend and refine the the service logics, for example, the  GetIndoorAirQuality action above needs to provide code for the mapping of the ppm intervals.

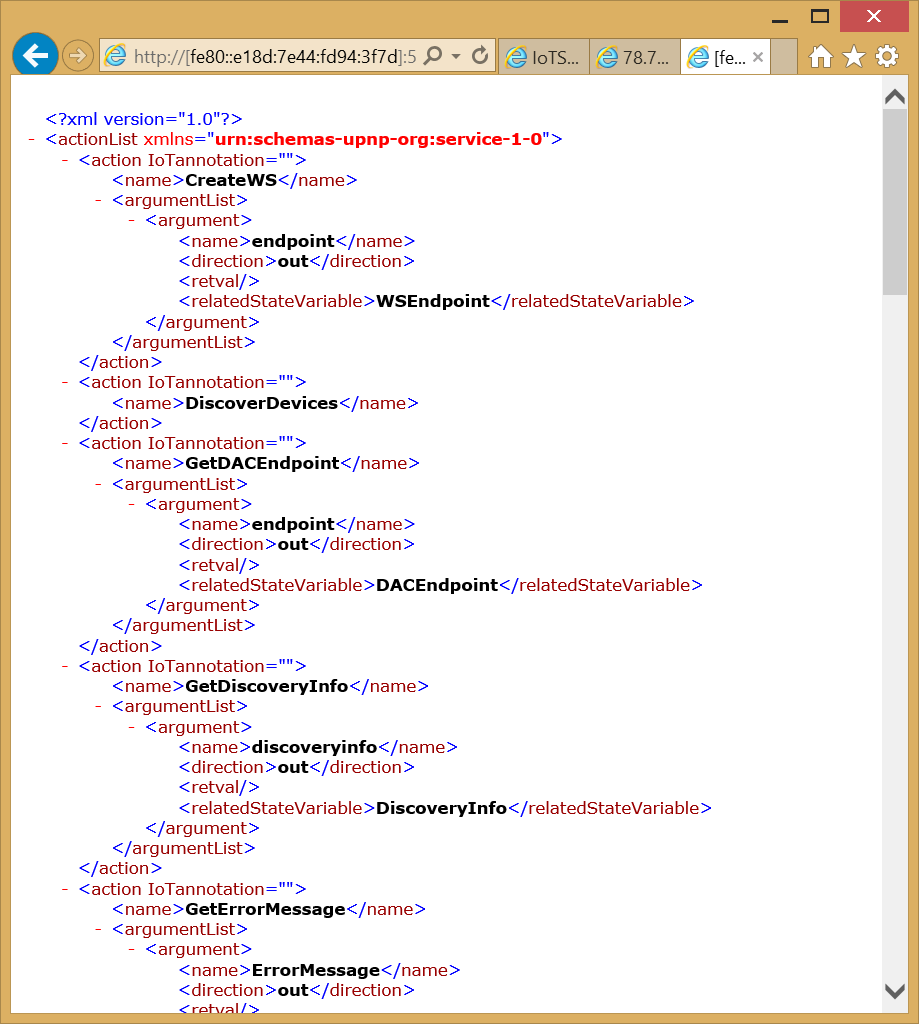
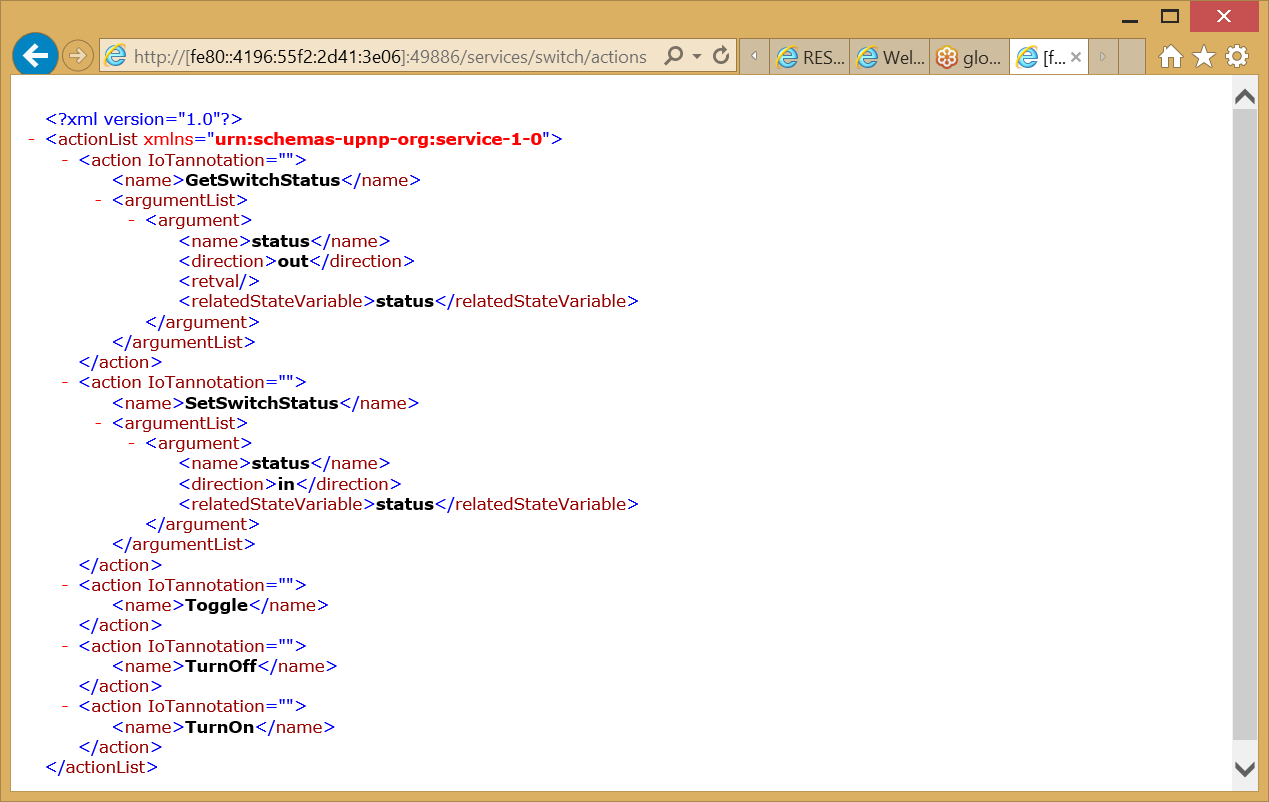
The following XML encodes the resulting Service definitions.

Android Version


IoT RC Browser for Android

IoT Resource Browser for Android is developed and optimized for Android phones and tablets with Android >2.2 api 8 and higher. The application is written in plain Java using open source extension libraries for UPnP stack and QR code scanning.
The UPnP library called Cling is written by 4th Line in Java.
http://4thline.org/projects/cling/.
The QR code scan library is called ZXing and can be found here.
https://github.com/zxing/zxing

Install instructions and download link coming soon.

The features in the IoT Browser application is best described by presenting the 3 main areas individually IoT BrowserDeployment Tool and Settings located in the main side meny.

Screenshot_2015-03-06-11-33-17

  1. IoT Browser

The browser is responsible for listing all IoT Resources from the Resource Catalogue. Which catalogue is displayed can be changed in the settings menu but default behavior is searching the local network using UPnP to find the catalogue and also all the IoTDevices individual.

More advanced features can be found by selecting a resource in the list (image 1). By selecting a resource the application will present its services and properties (image 2). From this view it is possible to select a service in order to show more information about actions for this specific service. Image 3 exemplifies this by showing all actions from a service called switch. Data from all three views are dynamic, meaning no hardcoded services or actions, thus working for all types of resources.

Screenshot_2015-03-06-11-34-07Resource_Services_AndroidResource_Properties_AndroidResource_SwitchService_Android

  • QR-scan

Resources and catalogues can also be found using QR-codes. These QR-codes are paths to a specific resource or a whole catalogue. One could print these QR-codes and put them on a resource or in an enclosed area, resulting in a smooth user experience. The user would only need to download the app and scan the code to be able to monitor and control resources.

QRscanning2_Android

  1. IoT Deployment Tool

The IoT Deployment Tool aims to make it easy to define a context, called IoTEntity, for a newly installed IoTDevice. An IoTDevice is defined by a IoTPropery. Simply explained can a IoTEntity be a room, for example “Livingroom” and the IoTProperty will be defined as a “DiscoBall” containing an IoTResource pointing to the IoTDevice in question.

Screenshot_2015-03-06-11-35-51Screenshot_2015-03-06-11-35-58Screenshot_2015-03-06-11-37-46

  1. Settings

In the settings menu it is possible to select which resource catalogue the browser should load from if the user actively not want to search the local network. Adding an endpoint can easily be done by clicking the ‘Add new endpoint’ list item. In order to change default endpoint the user can simply click and select desired endpoint from the “Select default endpoint” list item.
The user can also choose to delete all cache data which will mainly delete all saved endpoints as of now.

Screenshot_2015-03-06-11-38-06

iOS version


IoT RC Browser for iOS

IoT Resource Browser for iOS is developed and optimised for iPhones with iOS 8.0+ but also functional on iPads with iOS 8.0+ installed. The application is mainly written in Apples new programming language swift. However, the UPnP part of the application is written in C, C++ and Objective C, and is based on the open source library called UPnPx.

Installation is performed through CNets TestFlight account since the application is not yet available in the App Store. First step is to apply for beta testing on TestFlight using the iOS device and this link ( http://tflig.ht/PsJbMv ). CNet will then approve the request, and after approval it will be possible to install the app through TestFlight (on iOS home screen) which has been installed in the registration process during the first step.

The functions of IoT Browser is best described by presenting the main areas individually, these are symbolised by tabs in the application, Browser, QR-scan, Favorites, Deployment and Settings


Browser

The browser is responsible for listing all IoT Resources from the Resource Catalogue. Which catalogue is displayed can be changed in the settings menu but default behaviour is searching the local network using UPnP to find the catalogue. Resources that contain a number of predefined elements such as “switch status” or “energy consumption” will automatically display these values in the list view ( e.g. 2820 W as shown in image 1).

More advanced features can be found by selecting a resource in the list (image 1). By selecting a resource the application will present its services and properties (image 2). From this view it is possible to select a service in order to show more information about actions for this specific service. Image 3 exemplify this by showing all actions from a service called switch. Data from all three views are dynamic, meaning no hardcoded services or actions, thus working for all types of resources.

image 1
image 1
image 2
image 2
image 3
image 3


QR-scan

Resources and catalogues can also be found using QR-codes. These QR-codes are paths to a specific resource or a whole catalogue. One could print these QR-codes and put them on a resource or in an enclosed area, resulting in a smooth user experience. The user would only need to download the app and scan the code to be able to monitor and control resources.

image 4
image 4


Selecting a device in image 4 results in the same workflow as described in previous section and images (image 2 and image 3).


Favorites

The favorite tab can be used to group all important resources together. This view will present all resource that have been added as favorite in the properties view. Adding a favorite is possible in the properties view (image 2), by clicking on the star icon in the upper right corner. 

Remember that adding favorites when browsing the local network will only work locally. If using QR-codes or manually adding an endpoint favorites will be displayed independent of network.

image 5
image 5


Selecting a device in image 5 results in the same workflow as described in the Browser section and images (image 2 and image 3).


Deployment

The deployment part is a modelling tool where the user can create a world and add resources to it. The world consists of IoTEntities, IoTProperties and IoTResources which can be added using the plus-sign in the navigation bar. Adding a resource can be done through QR-codes (image 9) or manually by browsing current resource catalogue. Properties must be a subclass of an entity, e.g. Livingroom entity has TV consumption property. Furthermore, the resource can be connected to the property, e.g. Plugwise(measurement sensor) resource connects to TV consumption property .


IMG_1512
image 7
IMG_1514
image 8
IMG_1515
image 9


Settings

In the settings menu it is possible to select which resource catalogue the browser should load from. Resource catalogues from QR-scanning will automatically be saved and appear here but it is also possible to manually add an endpoint. Adding an endpoint can easily be done by clicking the ‘+’ symbol in the upper right corner. In order to change catalogue settings, one must first activate the edit mode, as shown in image 10. Once this is activiated, an entry can be change by clicking on the cell ( not the red sign, this will remove the row). Image 11 shows how it is possible to change credentials. Currently no specific username is required and the password is sent in the authentication header as Basic HTTP Authentication. Password is only required if the Resource Catalogue has been set up with a password.

image 6
image 9
image 7
image 10
image 8
image 11


Windows Version

Download and install the IoT Resource Catalogue Browser for Windows. When you double click on the executable it browser will first discover the IoTResourceCatalogue in your local  network. If you click on the catalogue name in the tree, you will see Three tabs to the right. The first tab shows you the number of IoTResources this catalogue has discovered.

cataloguebrowser1

The second tab shows the IoTResourceIds and the endpoints to  the different IoTResources. In case there are IoTResources which are in some error state and therefore cannot be accessed, they will be listed in the third tab.

cataloguebrowser2

 You can now expand the tree on the left. The gateway nodes corresponds to different hardware gateways (normally computers) in your network which hosts the IoTResources. If you click on one IoTResource, you will see three tabs  to the right. The first  tab (IoT) lists the statevariables/properties that are specific for LinkSmart.

cataloguebrowser3


The second tab (IoTObservation)  shows which statevariables are being logged into the local storage, and their current value, while the third tab lists the UPnP  specific metadata properties (like FriendlyName, Manufacturer, e tc)

cataloguebrowser4

If you expand the IoTResource node you will see the services it offers, and if you expand the service node you will see the actions that can be  performed.

cataloguebrowser5


By double clickking on the action you can then also directly invoke it.

cataloguebrowser6

Registering IoTResources

There are three  ways to register an IoTResource with the IoTResource Catalogue:

  • UPnP Discovery using SSDP and SCPD
  • SELF Registration
  • LinkSmart Event Registration

UPnP Discovery

If your IoTResources supports the UPnP  Protocol the  IoTResource will register automatically with the IoT Resource Catalogue.

The IoTResource needs to include the string “IoTdevice” in its “DeviceURN”element in the SCPD file.

The IoTResource should also implement the service IoTService.

If you have used the tool IoTResource Builder to create your IoTResource, all this is automatically  taken care of in the generated code.

SELF Registration

For IoTResources that don´t support UPnP there is a way to register the resource manually by using the RegisterResource action of the catalogue service of the IoTResourceCatalogue.

LinkSmart  Event Registration

This has not been implemented yet.