Archives: Wikis

Catalogue Services and Actions

The IoTResource Catalogue offers a number of services which can be listed using the the following REST-expression: http://<catalogueendpoint>/services. If you type this into a browser the result will be:
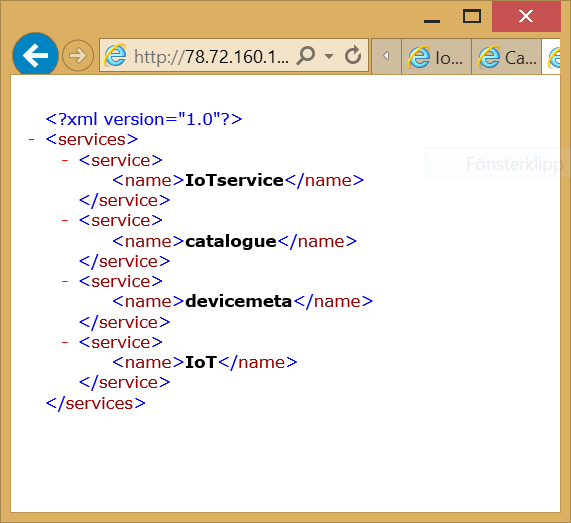
 

catalogueservices

Each service provides a number of actions that can be performed on the IoTResource. The catalogue service provides the main functionality of the IoTResource Catalogue. You can list all actions provided by a service with the following REST-expression: http://<catalogueendpoint>/services/actions. The returned XML specifies the action and the arguments needed to call it:
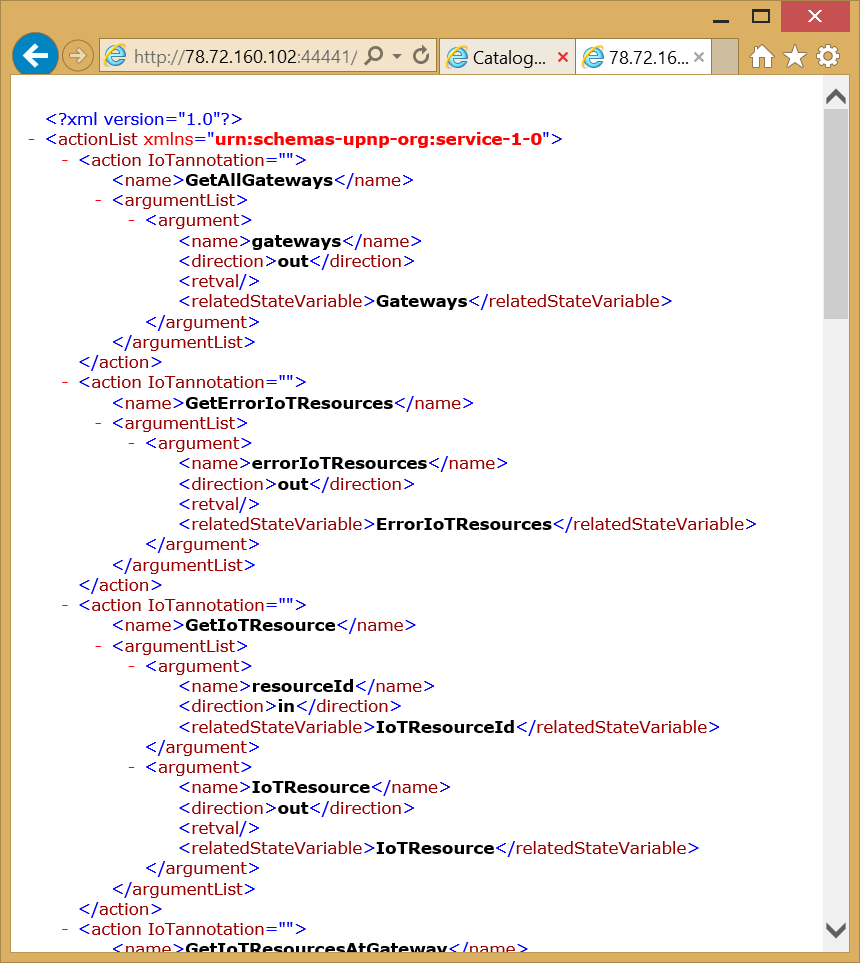
catalogueactions


Below is a short explanation of all actions:
GetAllGateways
Returns all  gateways known by the catalogue


GetErrorIoTResources
Returns all IoTResources that are in an error state,for instance that have disappeared from the network without telling about it


GetIoTResource
Argument: resourceId
Returns the SCPD for a specified IoT Resource


GetIoTResourcesAtGateway
Argument: gateway ID
Returns the SCPD file for all IoT Resources at a specified gateway


GetIoTResourcesEndpoints
Returns the IotResourceId, FriendlyName and the localendpoint for all  IoTResources known by the catalogue


GetIoTResourcesEndpointsFromXpath
Argument: Xpath expression
Returns the IotResourceId, FriendlyName and the localendpoint for all  IoTResources known by the catalogue that matches  the xpath description


GetIoTResourcesFromXpath
Argument: Xpath expression
Returns the SCPD file an for all  IoTResources known by the catalogue that matches  the xpath description


RegisterResource
Register an IoTResource directly  not using UPnPDiscovery.


GetManualIoTResources
Argument: manualIoTResources ????
Returns all  IoTResources that has registered themselves and not through UPnP


GetNumberOfIoTResources
Returns the number of  IoTResources,  UPnPDevices, ErrorResources


RemoveErrorIoTResources
Instructs the catalogue  to release  and forget about the IoTResources that are currently in the error list


ReScan
Instructs the catalogue  to issue a new M-SEARCH  command to find new IoTResources in the network


ReStartCatalogue
Instructs the catalogue  to forget about all IoTResources and ErrorResources and issue a ReScan command
Actuating on IoTResources

The IoTResource Catalogue provides  two means to actuate on an IoTResource:

  • By providing the unique identifier  of a specific IoTResource
  • By providing the local endpoint of a specific IoTResource
  • By providing a semantic description that matches one or several IoTResource

Using identifier

The keyword is IoTResource  to be supplied directly after the <catalogueendpoint> followed by the specific identifier and then the actuation expression:

http://<catalogueendpoint>/IoTResources/<IoTresourceid>/services/switch/actions/TurnOn

Using endpoint

By first calling the action GetIoTResourcesEndpoint in the catalogue service of the IoTResourceCatalogue  you will be able to retrieve  the local endpoint of the device and can start communicating direclty with the IoTResource. This method is recommended if you need to do a massive amount of  calls to IoTResource and then you don´t have to go throught the central IoTResourceCatalogue. However, it will only work if your Application is executing in the same local network as the IoTResources.


Using Semantic Description

Provide an xpath expression directly after the <catalogueendpoint> followed by the actuation expression:

http://<catalogueendpoint>/<xpath>/services/switch/actions/TurnOn

Example

Turn on all IoTResources that are of type switchdevice:

http://<catalogueendpoint>//upnp:devicetype[contains(.,’switchdevice’)]/services/switch/actions/TurnOn

Example

Turn off all IoTResources that are from CNet and that currently consumes more than 200W.

http://<catalogueendpoint>//upnp:device[upnp:manufacturer=’CNet’][IoT:currentconsumption>200]/services/switch/actions/TurnOff

Notes

One current limitation when using semantic descriptions is that the xpath expression cannot  contain the word services.

Searching for IoTResources

The IoT Resource Catalogue provides a Query language for finding IoTResources. The Query language is based on xpath for querying Xml documents. The IoTResource Catalogue takes an xpath expression and applies it to  the SCPD document of the IoTResources. The IoTResources that matches the xpath expression is then returned.

The  xpath querying can be used directly in the REST-Url:

http://<catalogueendpoint>/<xpathexpression

Some example expressions:

http://<catalogueendpoint>//IoT:gateway – returns all IoTResource that has a gateway-element

http://<catalogueendpoint>//IoT:gateway[.=’ARMSTRONG’] – returns all IoTResource that at gateway “ARMSTRONG”

Namespaces

The following namespaces can be used in the xpath expressions:

  • upnp
  • IoT
  • IoTObservation

IoTResource Catalogue

The Linksmart.net gateway provides mechanisms for routing requests regarding the physical world to the appropriate software resource that is able to fulfil the request, such as reporting the temperature in a particular  office  space  or the current electricty consumption of an household appliance.

This functionality is provided by the IoT Resource Catalogue. The catalogue discovers and keeps track of available IoTResources in the network. It provides a REST-based interface to select and retrieve data about IoTResources and their services.

IoTResources are software objects that provide IoT Services for applications and end-users, e.g., retrieving and analyzing data about the physical world, invoking actions and so on. Currently three types of IoTResources have been defined and implemented:

  • IoTDevice
  • IoTSensor
  • IoTThing

IoTResources typically runs in IoTWorld gateways. The IoTResources provides the means to deliver the information about IoTEntities in the IoTWorld and to actuate on them.

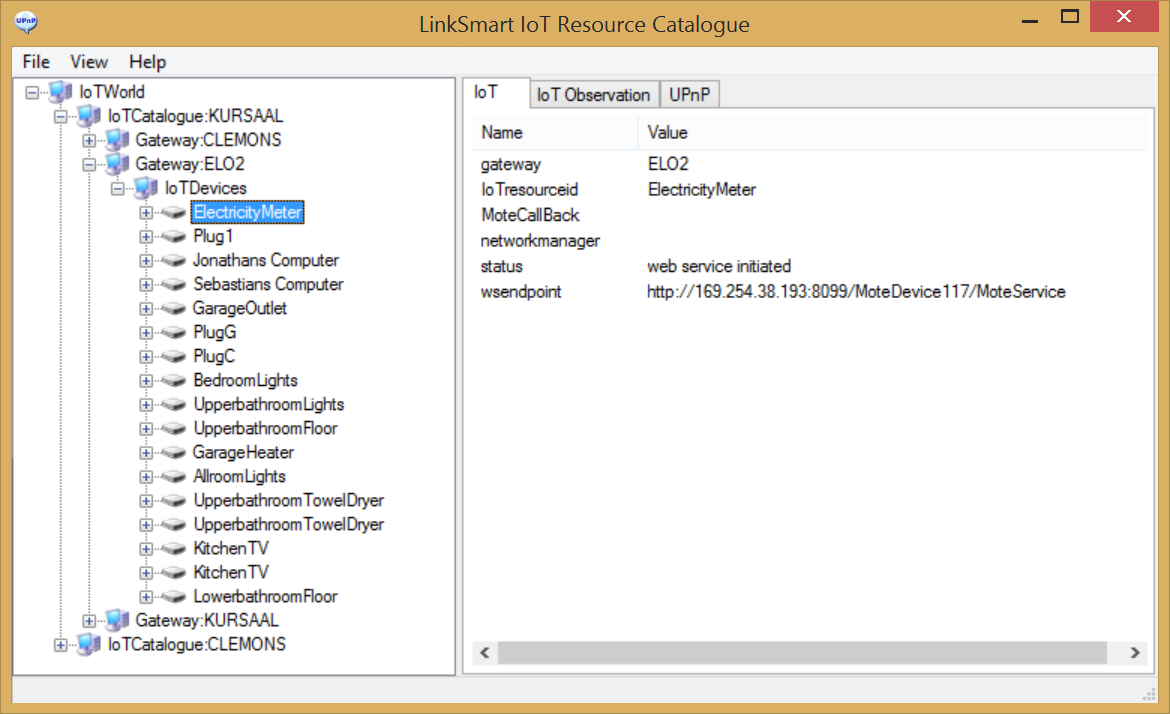
As an example see figure below that shows which IoTResources have been discovered on the IoTWorld gateway ”KURSAAL”, which handles several physical gateways (KURSAAL, ELO2,CLEMONS) and which IoT Services they offer. IoTResources are discovered and managed by the IoT Resource Catalogue.

cataloguebrowser3


Use case – Setting up an Event Subscription using the Network Manager and Event Manager

An important aspect when working with LinkSmart is to understand how to work with the network and how to use the LinkSmart addressing scheme together with SOAP tunnelling. Therefore we will start this section with a small use case for the usage detailing how the Network Manager is used. The actual interface definition for the Network Manager follows after this.

The use case selected is that a component wants to subscribe to events from a specific Event Manager.

The basic interaction steps necessary to connect to the LinkSmart network to be able to subscribe to events are:

  1. Create a service endpoint: This involves registering the event consumer as a service endpoint in the LinkSmart Network Manager, i.e. getting an Virtual Address for the endpoint. As soon as there is an Virtual Address for the endpoint it is possible to invoke the service on the LinkSmart network using SOAP tunnelling.
  2. Find the Event Manager: This will use the methods in the Network Manager to find the Virtual Address of the Event Manager. This Virtual Address will then be used to invoke the Event Manager.
  3. Subscribe to events: This step uses the virtual address for the event consumer to subscribe to events. This means that all matching events (Depending on which Topics has been subscribed to) will be forwarded to the event consumer service endpoint.

The following code examples are in C# but the structure and interaction with the services looks almost the same in any language.

Step 1 – Register the service endpoint

The first step is to register the service endpoint for the event callback listener. In this case we assume that the service is running on the end point http://127.0.01:8345/EventCallBack.svc.

//Create Nework Manager client

NetworkNanager.NetworkManager nm = new NetworkNanager.NetworkManager();

//First Create metadata associated with the registration, in this case only description

NetworkNanager.Part a = new NetworkNanager.Part();

a.key = "DESCRIPTION";

a.value = "Exemaple:Listener";

NetworkNanager.Part c = new NetworkNanager.Part();

c.key = "PID";

c.value = "My:Unique:Event:Listener:PID";

NetworkNanager.Part[] b = new NetworkNanager.Part[2];

b[0] = a;

b[1] = c;

//Register the service using the attributes and the end point where the service resides

NetworkNanager.Registration myreg = nm.registerService(b, "http://127.0.01:8345/EventCallBack.svc", "eu.linksmart.network.backbone.impl.soap.BackboneSOAPImpl");

Note that we only add one attribute to describe the Virtual Address, the DESCRIPTION. It is possible to add more attributes that can be useful for determining the type of service etc. All these attributes can be used when invoking the search functions of the Network Manager.

Step 2 – Find the Virtual Address

The second step is to find the Virtual Address Event Manager that we want to subscribe to using the Networks Managers search functionality.

string emDesc = "EventManager:INCERPI";

NetworkNanager.Registration[] r= nm.getServiceByDescription(emDesc);

In this case we identified the service only by it description “EventManager:INCERPI”. It is important to realize that this service can exist anywhere in the LinkSmart network and it is completely transparent for the client.

Step 3 – Set up a subscription

The final step is to call the Event Manager to setup a subscription to the service registered in the first step.

//Example of SOAPtunneling

EventManager.EMImplementation em = new EventManager.EMImplementation();

string vid = r[0].virtualAddressAsString;


//Set the Event Managers client endpoint to the SOAP tunnel address

em.Url = string.Format("http://127.0.0.1:8082/SOAPTunneling/0/{0}/", vid);


//Set up the subscription, listening to the to what the xPath expression matches

string xpath = "//[local-name()='IoTEntity']";

em.subscribeXPathWithPID(xpath, "My:Unique:Event:Listener:PID", 0);

Note that we use the Virtual Address created for our event callback listener service when subscribing. This will allow the Event Manager to publish events to us even if we are in a completely different network.

Network Manager

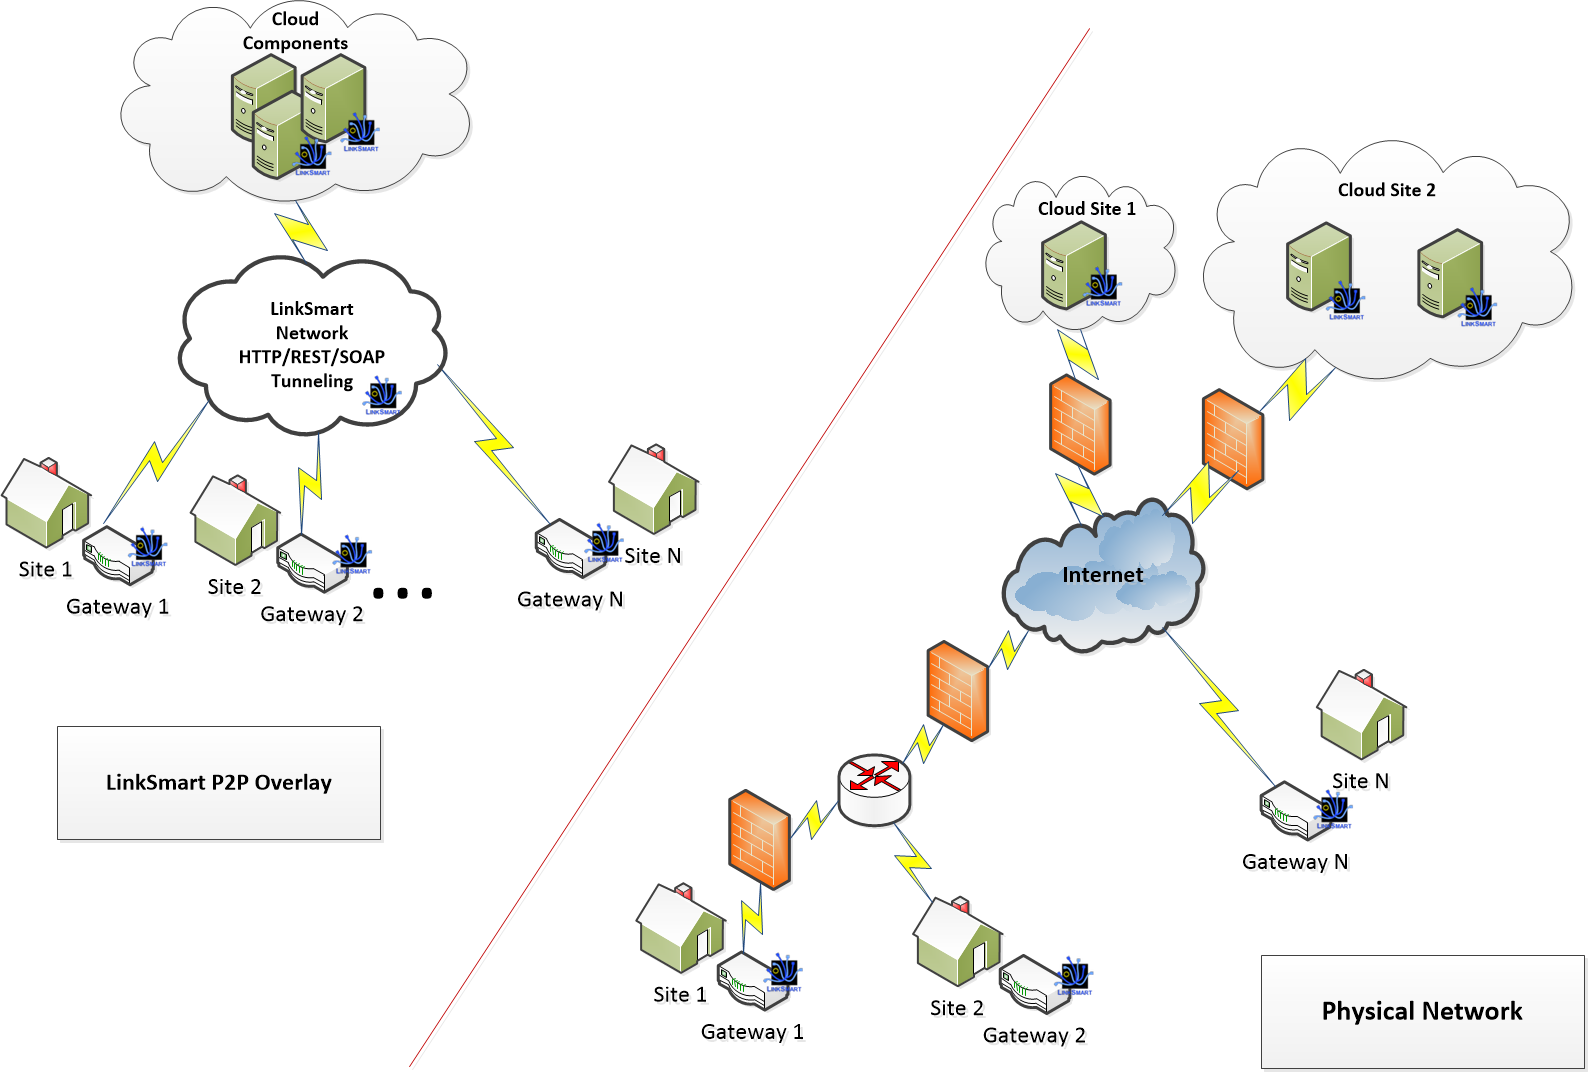
The Network Manager is the key LinkSmart component responsible for network management. It is in charge of providing a transparent view of the nodes in the application and to route the data to the appropriate node within the private LinkSmart P2P network, across fire wall boundaries.

The Network Manager is the entry and exit point of information of the LinkSmart middleware. There is only one Network Manager per gateway or node where the middleware is deployed. The Network Manager provides a web service interface which is the information entry point for the middleware. Data transferred between LinkSmart-enabled devices and gateways should always pass through the Network Manager.
The Network Manager is based on P2P and SOAP tunnelling combined with Web Services. It takes advantage of the peer-to-peer architecture to create a LinkSmart P2P overlay network and to allow the discovery of other IoT-enabled devices in other locations.

Network Model

The LinkSmart P2P overlay network creates a secured private network with its own addressing scheme that can cross NAT-borders and firewalls. It also handles the Virtual Addresses (LinkSmart IDs) which is the base for the overlay network addressing scheme. Each endpoint/service that is available in the overlay network has its own unique virtual address.
The Network Manager exposes services for creating and searching for virtual addresses, each virtual address can be associated with metadata to facilitate searching. Finally, it is in charge of synchronizing the nodes in the network with referential time.
In this way the Network Manager creates the “virtual” Internet of Things network upon which external components can operate.
As indicated in the figure LinkSmart will need a special node for managing the P2P network and this node is usually referred to as the supernode. The supernode is responsible for creating connections for communication in-between Network Managers that are not directly addressable on the internet, i.e. behind a firewall or on a NAT network. The supernode should be installed on a public ip-address. If the LinkSmart network is only a local network the supernode is not needed since the network managers will find each other automatically.
See Use case – Setting up an Event Subscription using the Network Manager and Event Manager for a description with  code examples on Network Manager usage.

Installing and configuring LinkSmart

Step 1: Download and install LinkSmart

  • Download and install LinkSmart 2.1 binaries  see Linksmart Sourceforge Wiki.
  • Start LinkSmart by running run_linksmart.bat or run_linksmart.sh depending on your OS.

Step 2: Configure the LinkSmart node

This will display the LinkSmart status page for the local node:

  • Click on the “LinkSmart Configurator” tab. This will display the configuration page

  • Click on network to configure the LinkSmart node.

  • Change the description of the Network Manager Instance, pick a description that really describes the node, for instance. NetworkManager:CNet_TestNode.
  • Press the “Update Configuration” button.

Step 3: Join the the public LinkSmart development network.

  • Click on the network.backbone.jxta configuration section:

Scroll further down on the page:

  • Change the value of “URI of SuperNode via TCP” to tcp://212.214.80.136:9101
  • Press the “Update Configuration” button.

Now you should have joined the LinkSmart development network

Step 4: Check that you are part of the LinkSmart Developer network

You should now find more network managers LinkSmart  in http://1270.0.1:8082/LinkSmartStatus (It can take some time before they appear)

  • Click on the “Network Managers only” button to only display active network managers and you should find some more network managers there.

Step 5: You are done!

Troubleshooting:

  • If you do not see any other nodes after a minute or two: Double check the java security files.
  • If you experience that the LinkSmart network is not stable, i.e. sometimes you see all the nodes and sometimes you do not see any you can try the following:
  1. Stop LinkSmart
  2. Delete the eu.linksmart.network.backbone folder in  the linksmart subfolder in your LinkSmart installation.
  3. Restart linksmart

RDFa in LinkSmart

Usage of RDFa attributes

The IoTEntity and Event models apply the simple but powerful W3C Recommendation RDFa approach to semantic annotation of data carried in Events and RESTful APIs. As is stated in http://www.w3.org/TR/rdfa-primer/ “It is worth emphasizing that RDFa uses URLs to identify just about everything… The reason behind this design decision is rooted in data portability, consistency, and information sharing. Using URLs removes the possibility for ambiguities in terminology“.

RDFa is a way of expressing RDF-style relationships using simple attributes in existing markup languages. A subset of RDFa attributes has been adopted by the IoTEntity and Event models:

  • @about – used for stating what the data is about (a ‘subject’ in RDF terminology). It is used for recording identifiers for Event, IoTEntity and IoTProperty resources (see also section on Evaluation Context below).
  • @datatype – to express the datatype of a literal
  • @property – a white space separated list of property references, used for expressing relationships between a subject and either a resource object if given or some literal text (also a ‘predicate’);
  • @typeof – a white space separated list of type references that indicate the RDF type(s) to associate with a subject;
  • @prefix – a white space separated list of prefix-name IRI pairs of the form “ab:http://tempuri.org

XML Schema datatypes for these attributes have been defines in the RDFaTypeDefinitions.xsd schema file, imported by the IoTEntity schema.

See the RDFa Recommendation for full details on usage of these attributes.

CURIEs

The key addressing component of RDF is the IRI (the internationalized resource identifier, IRI, is a generalization of the URI), but these are usually long and unwieldy. RDFa therefore supports a mechanism by which IRIs can be abbreviated, called ‘compact URI expressions’ or simply, CURIEs. It is RECOMMENDED to use CURIEs in IoTEntity and Event document instances.

For example, a type definition using the @datatype attribute with the value “xs:int” includes a prefix “xs” followed by a reference “int” and separated by a colon “:”. The prefix MUST have been earlier defined using a @prefix attribute at an appropriate level. With a prefix definition such as “xs:http://www.w3.org/2001/XMLSchema”, the “int” reference points to the “int” datatype as defined in the XML Schema W3C Recommendation.

Note the possible usage of multiple CURIE values to assert multiple type classifications according to RDFa.

For further information about CURIE syntax, see Section 6 of the RDFa Recommendation. CURIE processing is described in Section 7.4 of the RDFa Recommendation.

Evaluation Context – xml:base and about attributes

The initial evaluation context for relative URIs in the document being processed is usually given by the URI of the document itself, but it can also be explicitly set by using the @xml:base attribute on the Event, IoTEntity or IoTProperty elements (when it appear at the root level). For example, an IoTEntity identifier provided in the @about attribute is relative to the initial evaluation context, and the id of the IoTProperty is relative to the IoTEntity.

See Section 7.2 of the RDFa Recommendation for further details.